
How to Onboard New Pool Service Customers Smoothly

A new customer calls. They want weekly pool service. You say yes, take their address, and tell the tech to swing by on Thursday. The tech shows up, has no gate code, no idea what chemicals to bring, and no clue what the monthly rate is. The customer gets a bad first impression. You spend the rest of the week putting out fires.
This happens all the time. It does not have to. A simple onboarding checklist can turn every new signup into a smooth, repeatable process. Here is how to build one.
Key Takeaways
- Use the same steps every time. A written checklist means no one skips a step, no matter who handles the new customer.
- Collect everything up front. Contact info, access details, payment method, and pool details should all be in the system before the first visit.
- Set expectations early. Tell the customer what you will do, when you will come, and how billing works. Do this before the first service, not after.
- Make the first visit count. A full inspection and baseline chemical readings on day one give you a starting point for everything that follows.
Step 1: Handle the First Call in PoolDial
Every new customer starts with a phone call, a text, or a form on your website. This first contact is your chance to collect the basics and decide if the customer is a good fit.
During the first call, get:
- Name and phone number. You need these to create a record in your customer database.
- Service address. Where is the pool? Is it in your service area? Is it on or near an existing route?
- What they need. Weekly service? One-time cleanup? Repair only? This tells you what to quote.
- How they found you. Referral, Google, yard sign? Tracking this helps you know what marketing works.
If the customer is in your area and needs a service you offer, schedule a site visit. Do not quote a price over the phone without seeing the pool first. Every pool is different, and guessing leads to undercharging or losing the job.
Step 2: Do the Site Visit and Quote with PoolDial
The site visit is where you see the pool, check the equipment, and decide on a price. It is also your first chance to make a good impression in person.
During the site visit:
- Look at the pool. Check the water color, surface condition, and size. Note if there is a spa, water features, or a cover.
- Check the equipment. Look at the pump, filter, heater, salt cell, and automation system. Write down brand names and model numbers.
- Note access details. How do you get in? Is there a gate code, a lock, or a hidden key? Are there dogs?
- Take photos. Snap a picture of the equipment pad, the backyard layout, and any problem areas. These photos will help your tech on the first visit.
- Give the quote. Based on what you see, tell the customer the monthly price for weekly service. Be clear about what is included and what costs extra.
If the customer says yes on the spot, move to the next step. If they need time to think, follow up within 24 hours. Waiting longer than that and you risk losing them to another company.
Step 3: Sign the Service Agreement in PoolDial
Before you start service, get a written agreement in place. This protects you and sets clear expectations for the customer. It does not have to be long or complicated. A one-page document works fine.
Your service agreement should cover:
- Services included. What you will do each visit (skim, brush, vacuum, test and balance chemicals, clean the filter basket, etc.).
- Visit schedule. Which day of the week you will come. Be clear that the day may shift for holidays.
- Monthly price. The flat rate and when it is due.
- Extras and repairs. How you handle things that are not part of weekly service, like equipment repairs or green pool cleanups.
- Cancellation terms. How much notice you need to cancel service.
Getting this signed before the first visit saves you from "I thought that was included" conversations later. It also makes your business look professional from day one.
Step 4: Collect Payment Info and Set Up PoolDial Billing
Do not wait until the end of the first month to figure out how you will get paid. Collect payment info the same day the customer signs up. The easiest way to do this is to put a card on file and set up autopay.
Here is why this matters:
- No chasing payments. When autopay runs on the same day every month, you do not have to send reminders or make awkward phone calls.
- Faster cash flow. You get paid on time, every time, without waiting for checks in the mail.
- Less admin work. PoolDial handles invoicing and payment collection for you. You set it and forget it.
If a customer does not want autopay, that is fine. But make sure you have their email address so you can send invoices through PoolDial. For more on setting up automatic payments, read our guide on setting up autopay for pool customers.
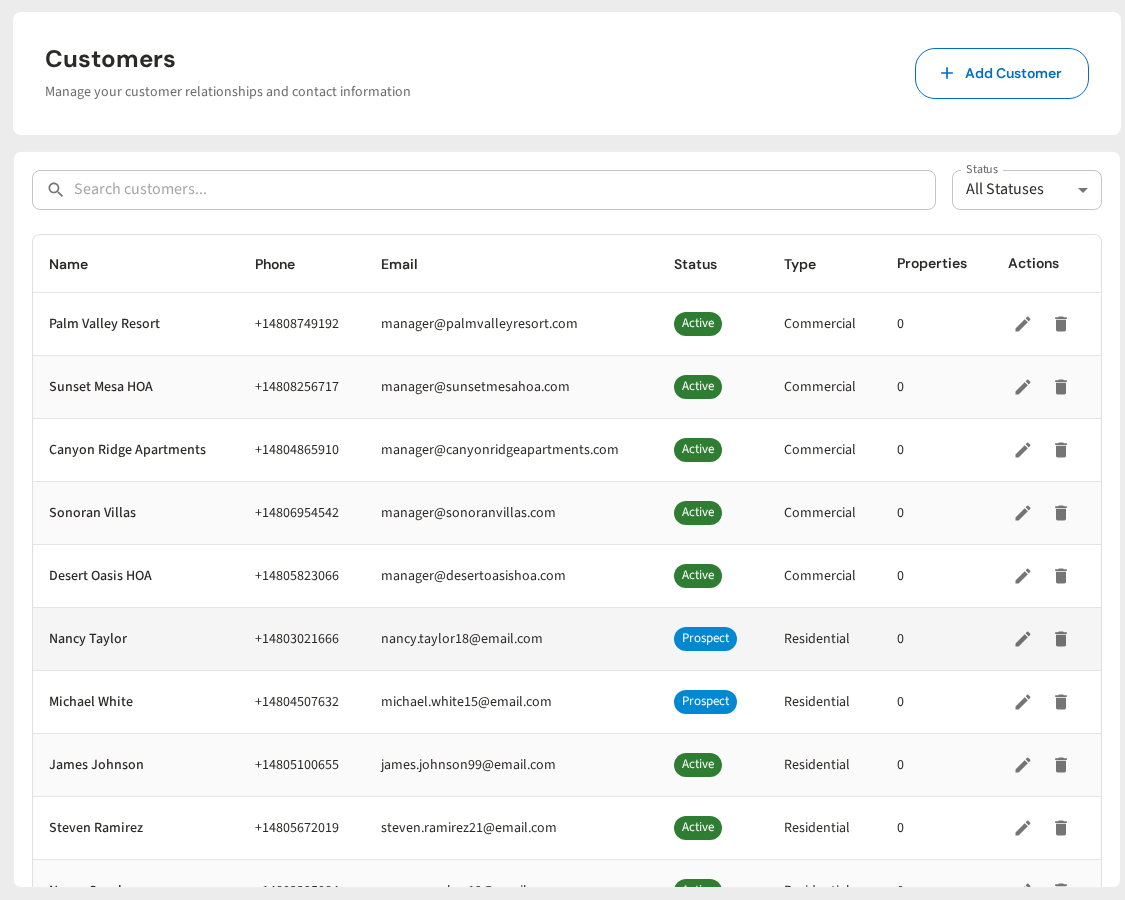
Step 5: Enter the Customer into PoolDial
Now it is time to put everything into the system. Do this the same day you sign the customer, not next week. The longer you wait, the more details you forget.
In PoolDial, create the customer profile with:
- Contact info. Name, phone, email, service address, and billing address.
- Access details. Gate code, lock combo, parking instructions, and pet warnings.
- Pool details. Size in gallons, surface type, and any special features like a spa or saltwater system.
- Equipment. Every piece of equipment with brand, model number, and install date if you have it.
- Special instructions. Anything the tech needs to know. "Use the side gate." "Do not move the patio furniture." "The dog is friendly but loud."
- Photos. Upload the equipment pad photo and backyard layout from your site visit.
- Billing. Monthly rate, billing cycle, and card on file.
The goal is simple. When your tech opens this customer's profile on their phone, they should have everything they need to do the job right. For more on what to store per customer, see our guide on organizing pool customer records.
Step 6: Assign the Customer to a Route Day in PoolDial
With the customer in the system, you need to add them to a route. Pick the day that makes the most sense based on where the pool is and how many stops you already have that day.
Things to think about when choosing a route day:
- Location. Put the new stop near other stops in the same area. This cuts down on drive time and fuel costs.
- Route balance. If Monday already has 20 stops and Wednesday has 12, put the new customer on Wednesday. Balanced routes mean your techs finish at a steady time each day.
- Customer preference. Some customers care about which day you come. If they asked for a specific day and it works for your route, honor it. If not, explain why a different day is better.
Once you pick the day, let the customer know. Send them a quick text or email: "We have you set up for weekly service on Wednesdays. Your first visit will be this Wednesday, April 30." For tips on fitting new customers into your schedule, check out our guide on rearranging pool routes for new customers.
Step 7: Run the First Service Visit with PoolDial
The first visit is not a normal service call. It is your chance to set a baseline and show the customer what professional pool care looks like.
On the first visit, the tech should:
- Do a full inspection. Check the pump, filter, heater, salt cell, and all plumbing connections. Look for leaks, cracks, and worn parts. Note anything that needs attention.
- Take baseline chemical readings. Test chlorine, pH, alkalinity, CYA, calcium hardness, and salt (if it is a saltwater pool). Log all of these in PoolDial's chemical tracking system. These first readings become the starting point you measure against going forward.
- Do a thorough cleaning. Skim, brush, vacuum, and clean out all baskets. The pool should look noticeably better when the tech leaves.
- Verify access and instructions. Make sure the gate code works, the equipment matches what was logged, and the special instructions are correct. If anything is wrong, update the record right away.
- Take a "before" photo. If the pool needs work, a before photo is valuable. You can show the customer the improvement over the first few visits.
Step 8: Follow Up After the First Visit with PoolDial
Most pool companies skip this step. That is a mistake. A quick follow-up after the first visit shows the customer you care and gives you a chance to catch problems early.
Within 24 hours of the first service, send the customer a message. You can text or email them right from PoolDial. Keep it short:
- Thank them for choosing your company.
- Tell them what was done. "We tested your water, balanced your chemicals, and gave the pool a full cleaning."
- Share the chemical readings. This shows you are tracking the details and builds trust.
- Mention anything that needs attention. "Your filter pressure was a little high. We will keep an eye on it and let you know if the filter needs a clean."
- Ask if they have questions. This opens the door for them to bring up anything they forgot to mention.
This one message does more for customer retention than anything else in the onboarding process. It turns a transaction into a relationship.
Onboard Every Customer the Same Way
PoolDial keeps your customer records, routes, billing, and chemical logs in one place. Build a repeatable onboarding process your whole team can follow. Plans start at $2/pool.
Start Your Free Trial